Non-line-of-sight rendering
This tutorial shows how to setup a NLOS scene with a relay wall and a hidden object, and use mitransient to simulate the capture process of illuminating and capturing points in the relay wall.
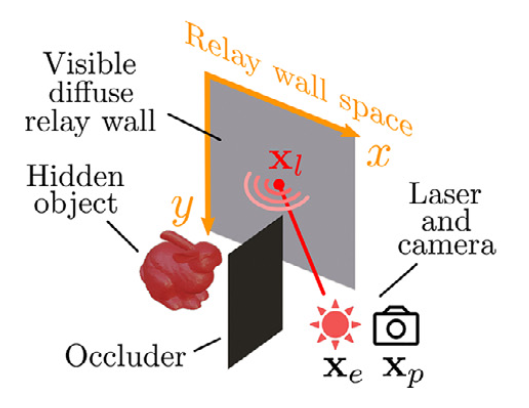
In your scene, you will need to set up the following components:
From here you have two alternatives:
Configure the XML/Python code of the scene youself, using the help below
Use https://github.com/diegoroyo/tal.
talis a toolkit that allows you to create and simulate NLOS scenes with an easier shell interface instead of directly from XML/Python.
Here’s a list of the required plugins and configuration in your scene:
- Relay wall: The relay wall must be defined using a rectangle shape with ID “relay_wall” i.e.
<shape type="rectangle" id="relay_wall"> Camera: Inside this shape, you must place a
nlos_capture_meterplugin, which will focus your camera towards a set of points in the relay wall. In order to configure thenlos_capture_meter, read its documentation.
- Relay wall: The relay wall must be defined using a rectangle shape with ID “relay_wall” i.e.
Laser/light source: You must define an active illumination emitter that has the ID “laser”. You can use the existing
projectorplugin with a low enoughfovparameter. In order to point the laser to the relay wall, we recommend using our helper functions instead of using the ``transform`` plugin. In our example, we only define the ``translate`` part of the ``transform``:
<emitter type="projector" id="laser">
    <transform name="to_world">
        <translate x="-0.5" y="0.0" z="0.25"/>
    </transform>
    <rgb name="irradiance" value="1.0, 1.0, 1.0"/>
    <float name="fov" value="0.2"/>
</emitter>
- Pointing the laser source to the relay wall: You can use our helper functions for this purpose. We offer three alternatives:
mitransient.nlos.focus_emitter_at_relay_wall_3dpoint(target, relay_wall, emitter): Accepts ami.Point3fwith the XYZ coordinates on the relay wall where the laser should be pointed at.mitransient.nlos.focus_emitter_at_relay_wall_uv(uv, relay_wall, emitter): Accepts ami.Point2fwith the UV coordinates of the shape that you used as relay wall (e.g. if your relay wall is a rectangle, passingmi.Point2f(0.5, 0.5)will point the laser at the center)mitransient.nlos.focus_emitter_at_relay_wall_pixel(pixel, relay_wall, emitter): Accepts ami.Point2fwith the pixel coordinates (e.g. if you capture a grid of 3x3 points with yournlos_capture_meter, passingmi.Point2f(1, 1)will point the laser at the center of the center pixel)Note that you need to pass the
relay_wallandemitterparameters, which should be the shapes with ID “relay_wall” and “laser”. See the examples Jupyter notebook for more information.
Hidden object and occluders: You can add other shapes in the locations that you want with no restrictions.
Integrator: We provide a
transient_nlos_pathplugin which implements a path-tracing algorithm with specific techniques which work better in NLOS setups. We strongly recommend that you read the documentation and our paper for further information.